


【AZ-900】Tools for Estimating and Managing Costs in Azure
Hi, I’m Makoto, a freelance engineer.
If you want to know how much Azure costs, you can find out the price for each service on the Azure pricing page.
It’s fine if you want to know about a single service, but in many cases, you may have the following requests or questions:


For such cases, Azure provides convenient estimation tools. In addition, you can seamlessly check the actual costs incurred while using Azure from the Azure Portal screen.
In this article, I’ll introduce you to tools for estimating and managing Azure costs.
Let’s get started!
Pricing Calculator
To estimate the monthly cost of Azure, use the pricing calculator. You can easily create an estimate by entering the configuration and number of services you want to use.
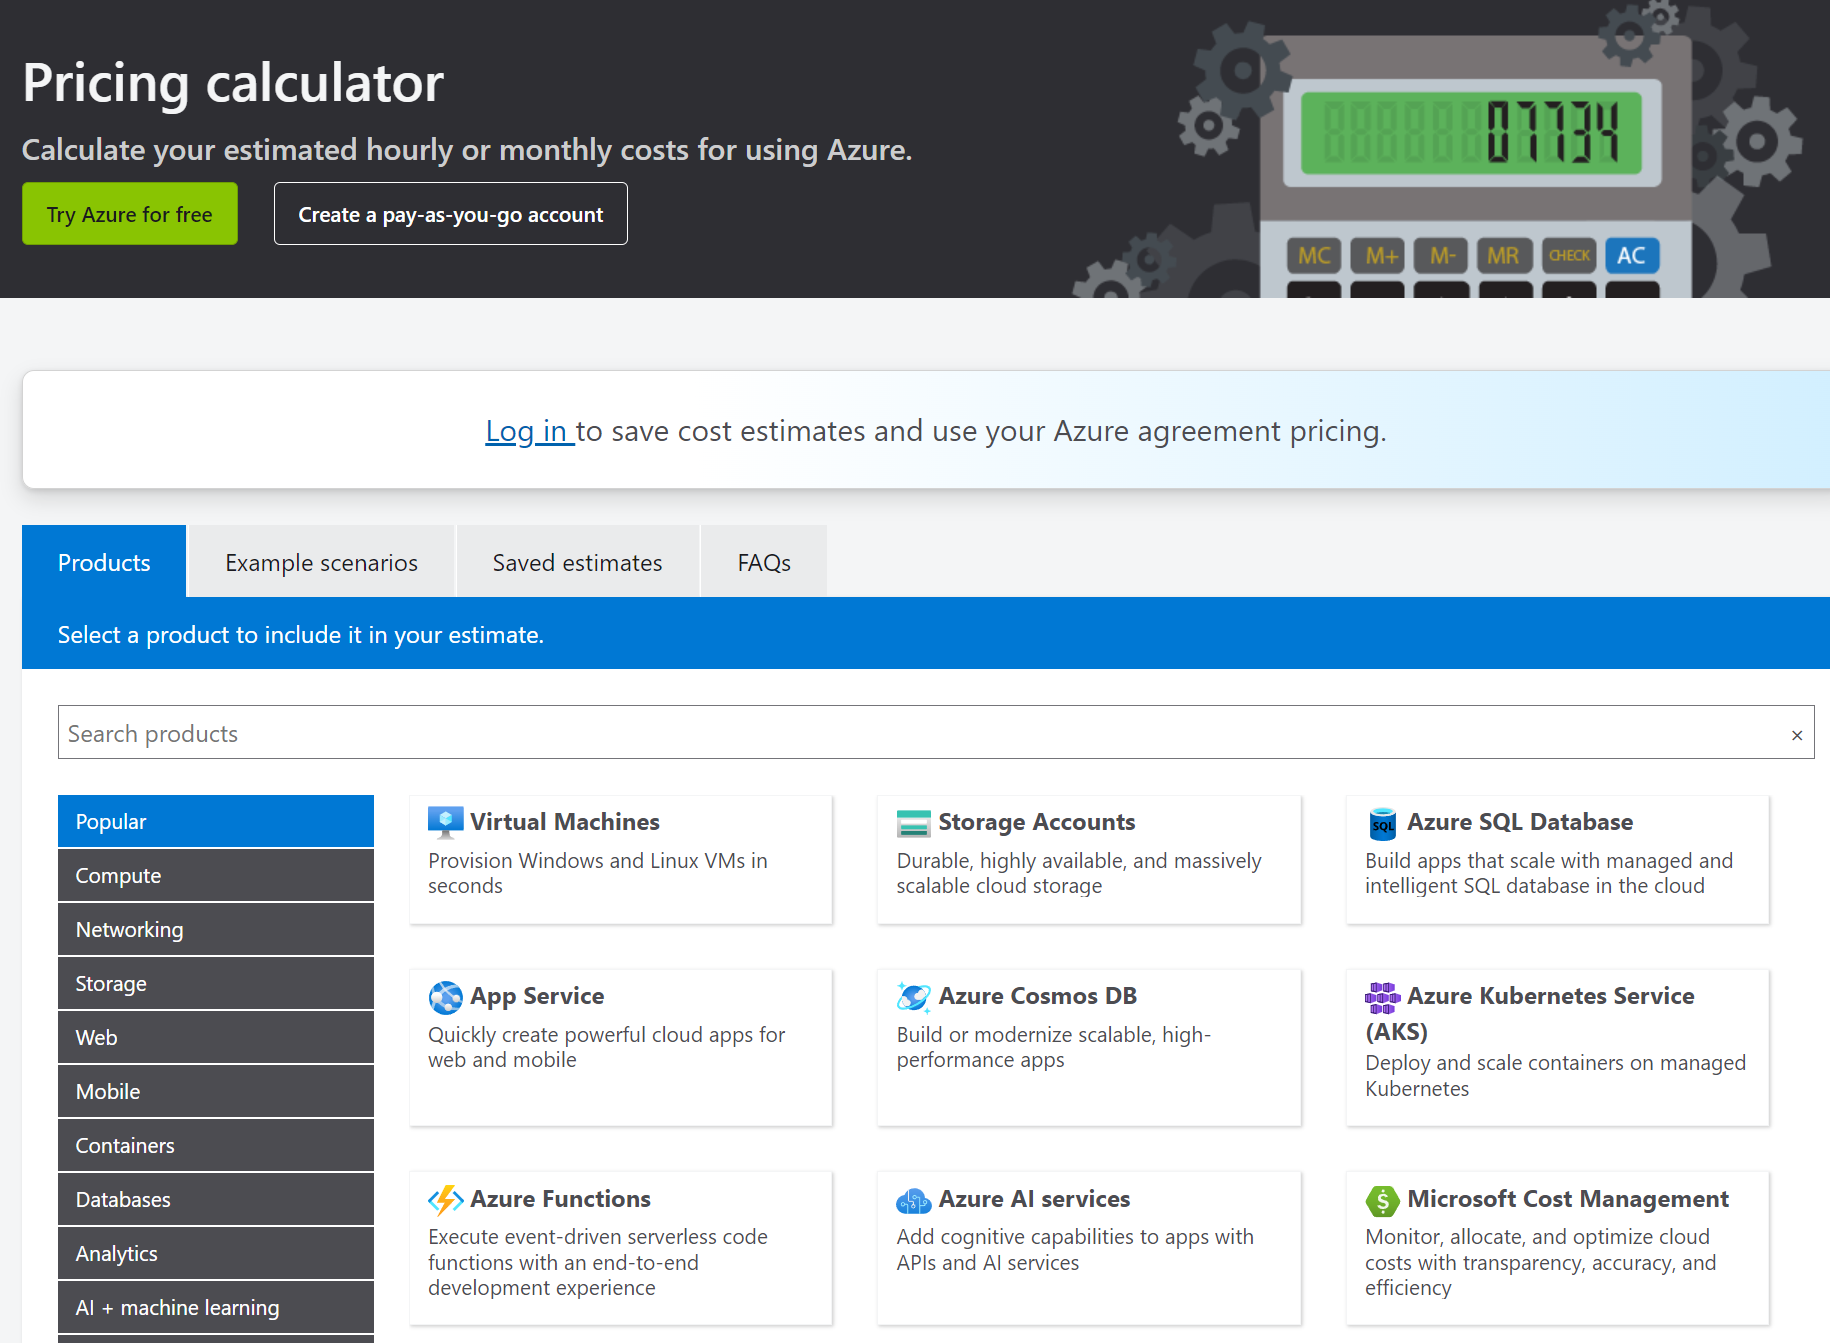
For example, to estimate the cost of a virtual machine, select Virtual Machines from the list of services. The selected service is added to the Estimate Details area.
If the currency units are different, you can change them from the pull-down menu at the bottom right of the page.
 Scroll down to the details pane and enter the virtual machine’s estimation conditions. As explained in detail in this article, you’ll see that it is divided into four sections:
- Virtual Machines
- Managed Disks (disk size)
- Storage Transactions (read/write)
- Bandwidth (data transfer)
Items other than Virtual Machines are collapsed by default, so expand them to enter information.
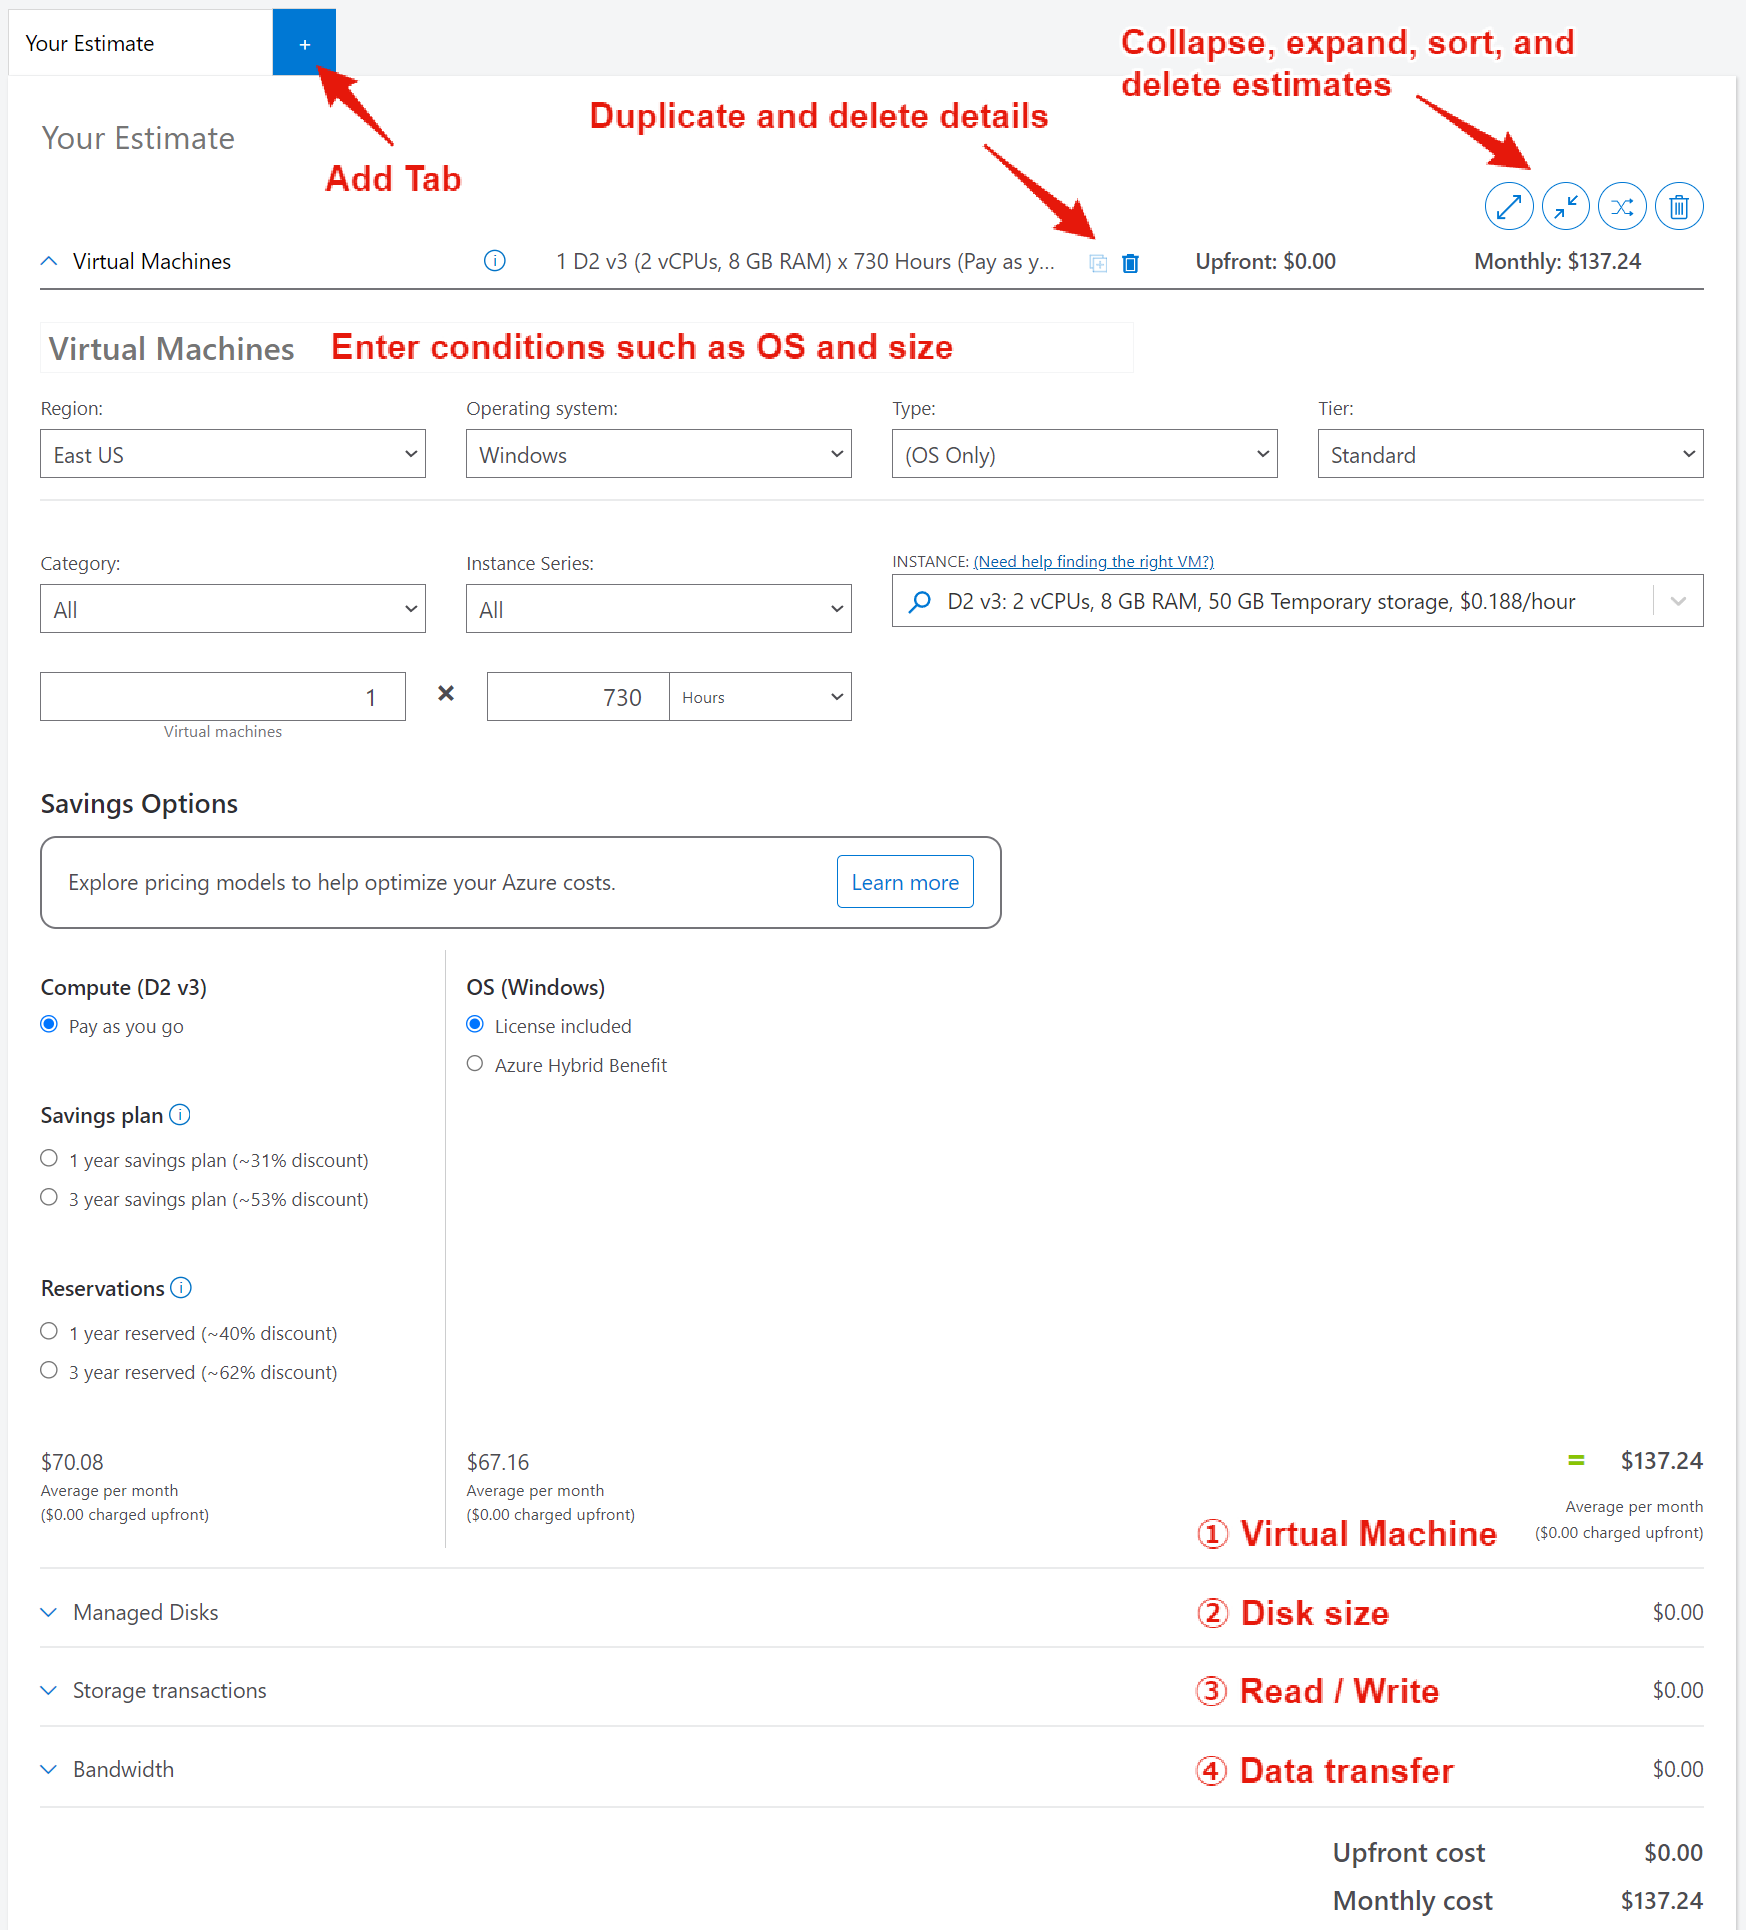
Note that if you want to assign a public IP address, you should separately add “IP Addresses” to the details and enter the condition.
Also, if you want to create a quote for several virtual machines with exactly the same configuration, the Duplicate button in the details will come in handy. The button is small and easy to miss, but it’s definitely there.
There are also several options for sharing the estimate you’ve created. Some of these can only be used when you’re logged in. If you’re creating estimates for company business, you’ll use these sharing options a lot, so keep them in mind.
- Export: Save locally in Excel
- Save: Save as history on the pricing calculator
- Save as: Save as history with a name on the pricing calculator
- Share: Create a link

Key Points:
The pricing calculator is used to estimate the monthly cost for a selected service.
Total Cost of Ownership (TCO) Calculator
When migrating from on-premises to Azure, you can use the Pricing Calculator to estimate an equivalent infrastructure configuration based on the number and configuration of existing servers.
But can we just compare based on hardware costs alone? There are other costs associated with running IT systems on-premises, such as:
- Utility costs
- Personnel costs
- Data center costs
The Total Cost of Ownership (TCO) Calculator is useful for comparing and estimating the costs, including these expenses, of migrating from on-premises to Azure.
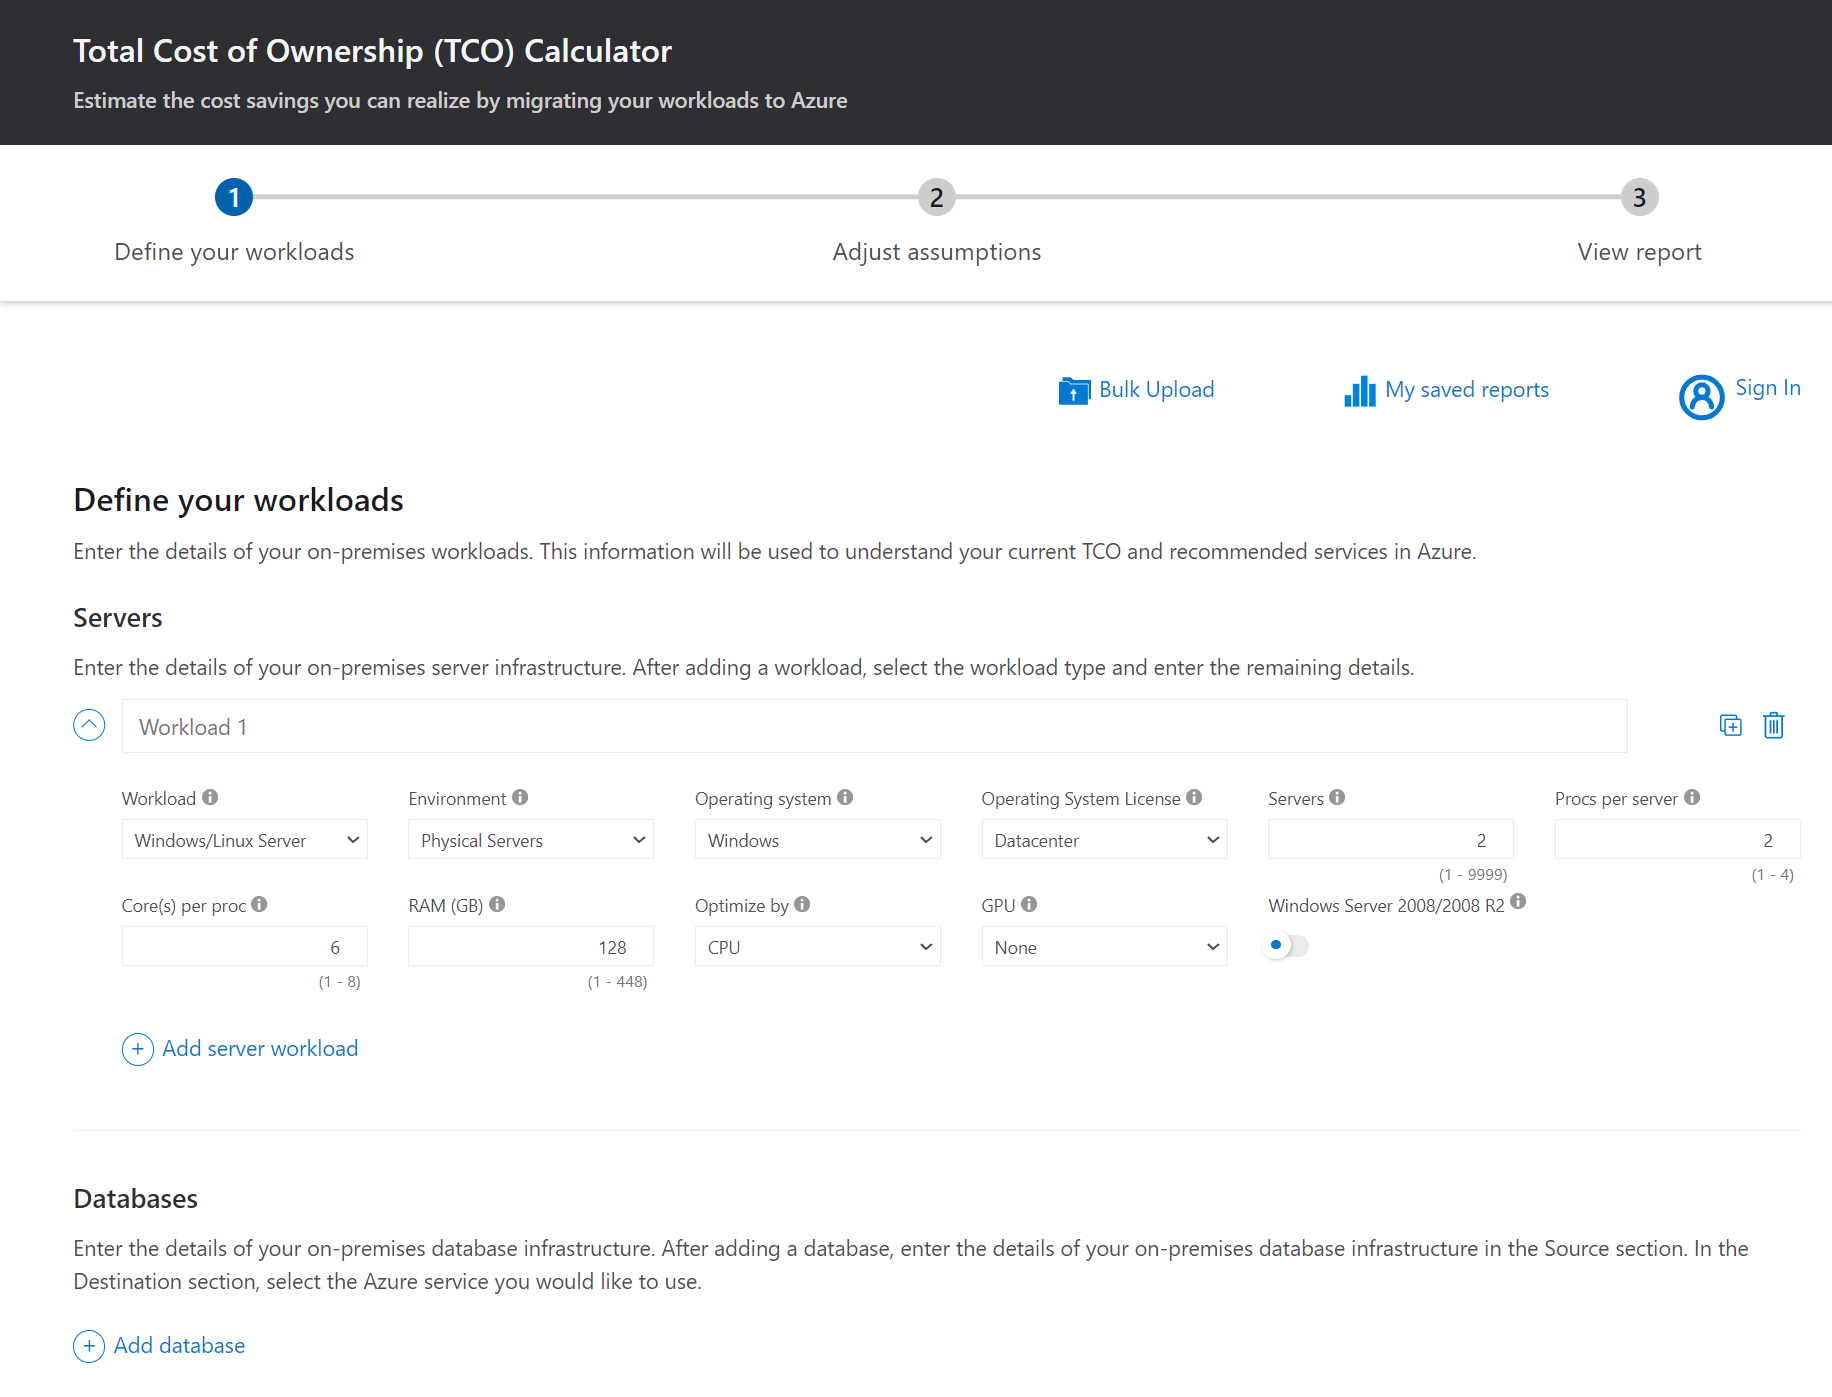
In the Total Cost of Ownership (TCO) Calculator, you enter information about servers, databases, storage, and network traffic used on-premises as “①Workloads” and enter conditions for the calculation, such as whether to apply hybrid benefits, whether to backup across regions, power costs, and personnel costs in “②Assumptions“.
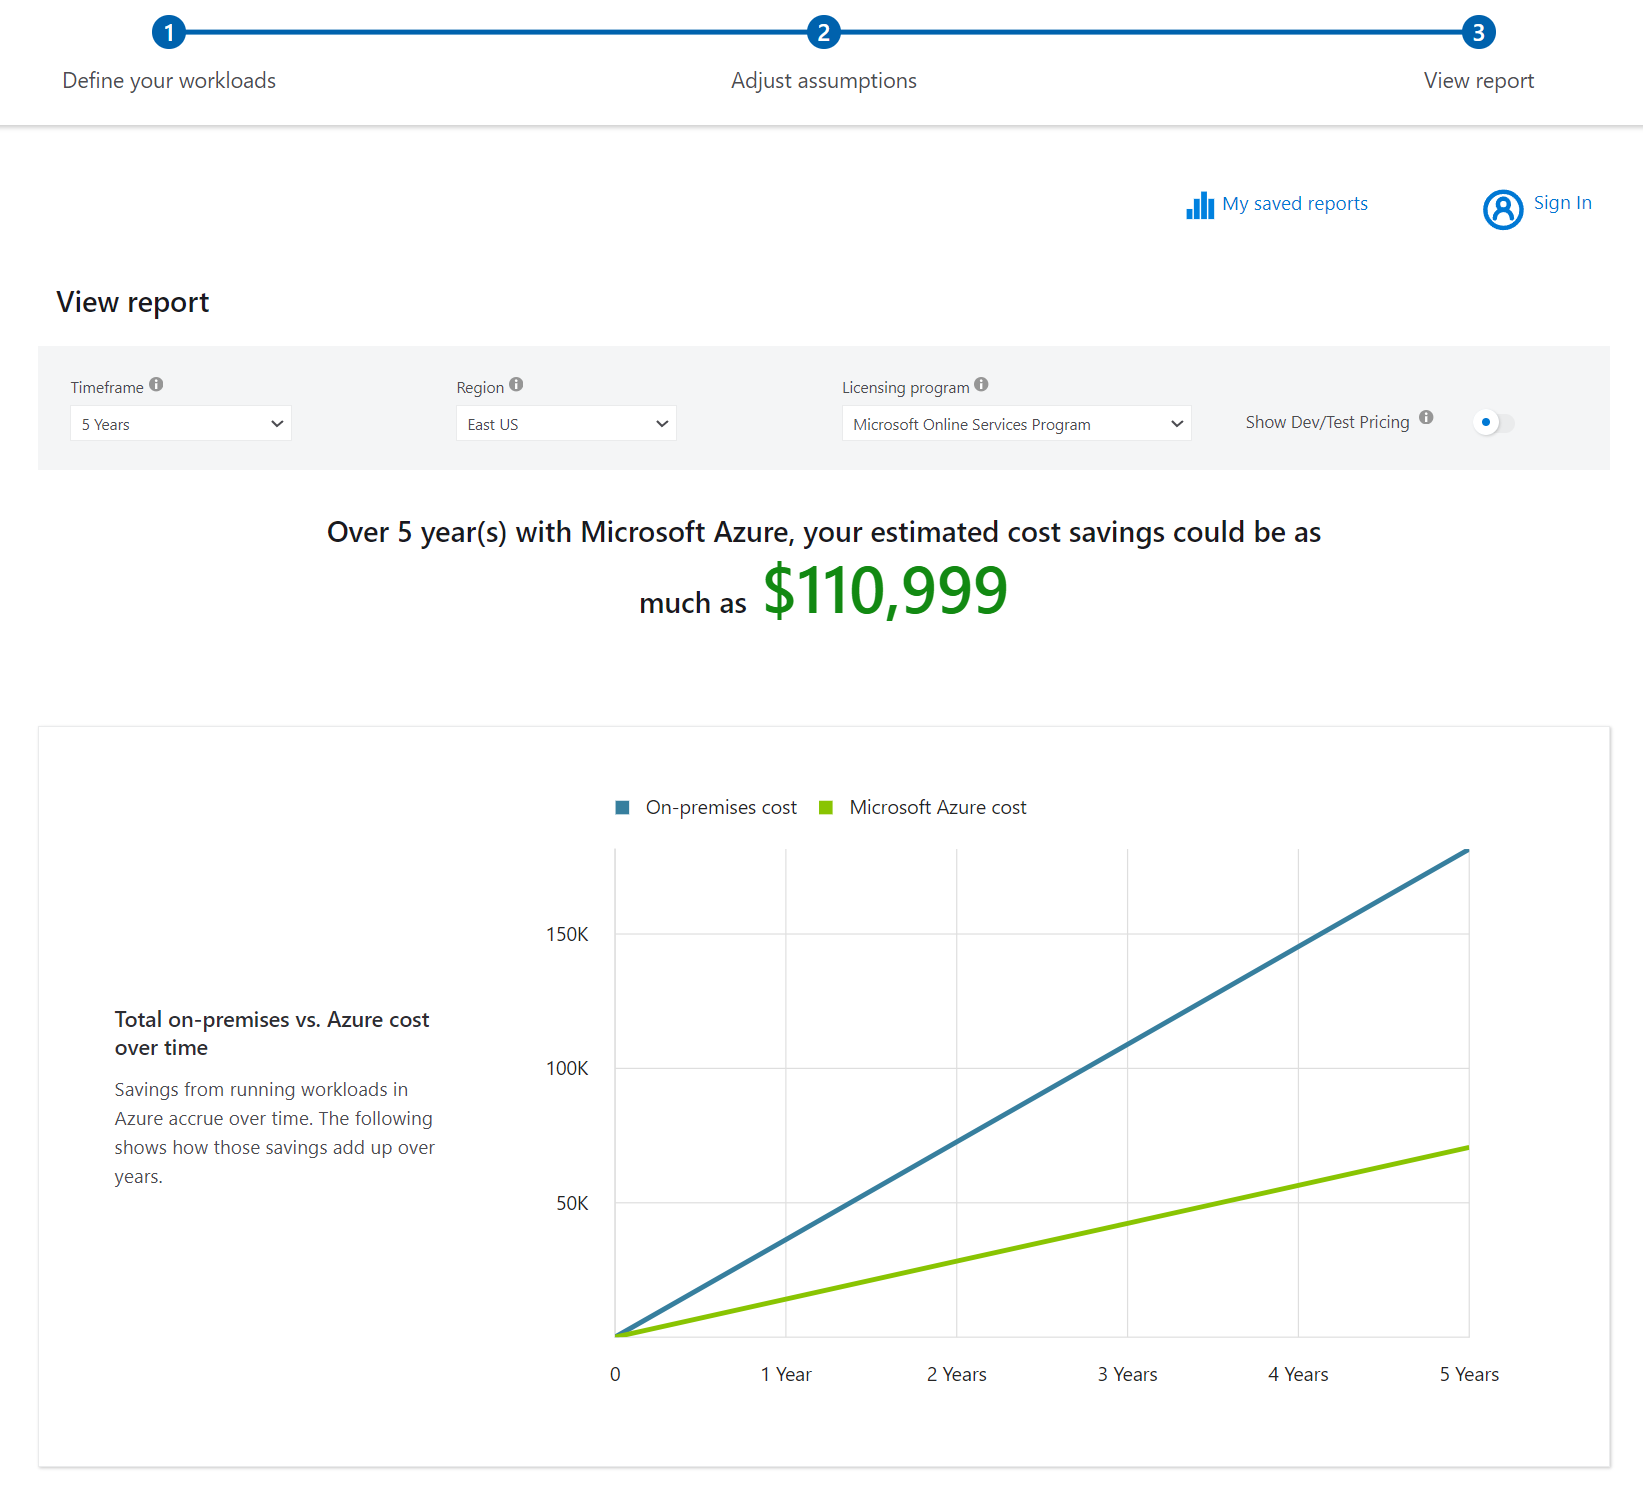
Then, based on the workloads and assumptions entered, a “③Report” is generated. It’s easy to understand because the cost trends and breakdowns for on-premises and Azure cases are visualized in graphs.
Key Points:
The Total Cost of Ownership (TCO) calculator is used to estimate the cost of migrating an on-premises environment to Azure.
Cost Management and Billing
While the Pricing Calculator and Total Cost of Ownership (TCO) Calculator are primarily tools for estimating and comparing future Azure usage charges, to review past (current) Azure usage charges, use the Cost Management + Billing menu in the Azure Portal.
From the Overview menu, you can review a dashboard-style summary, including past billing amounts and the percentage of current usage.
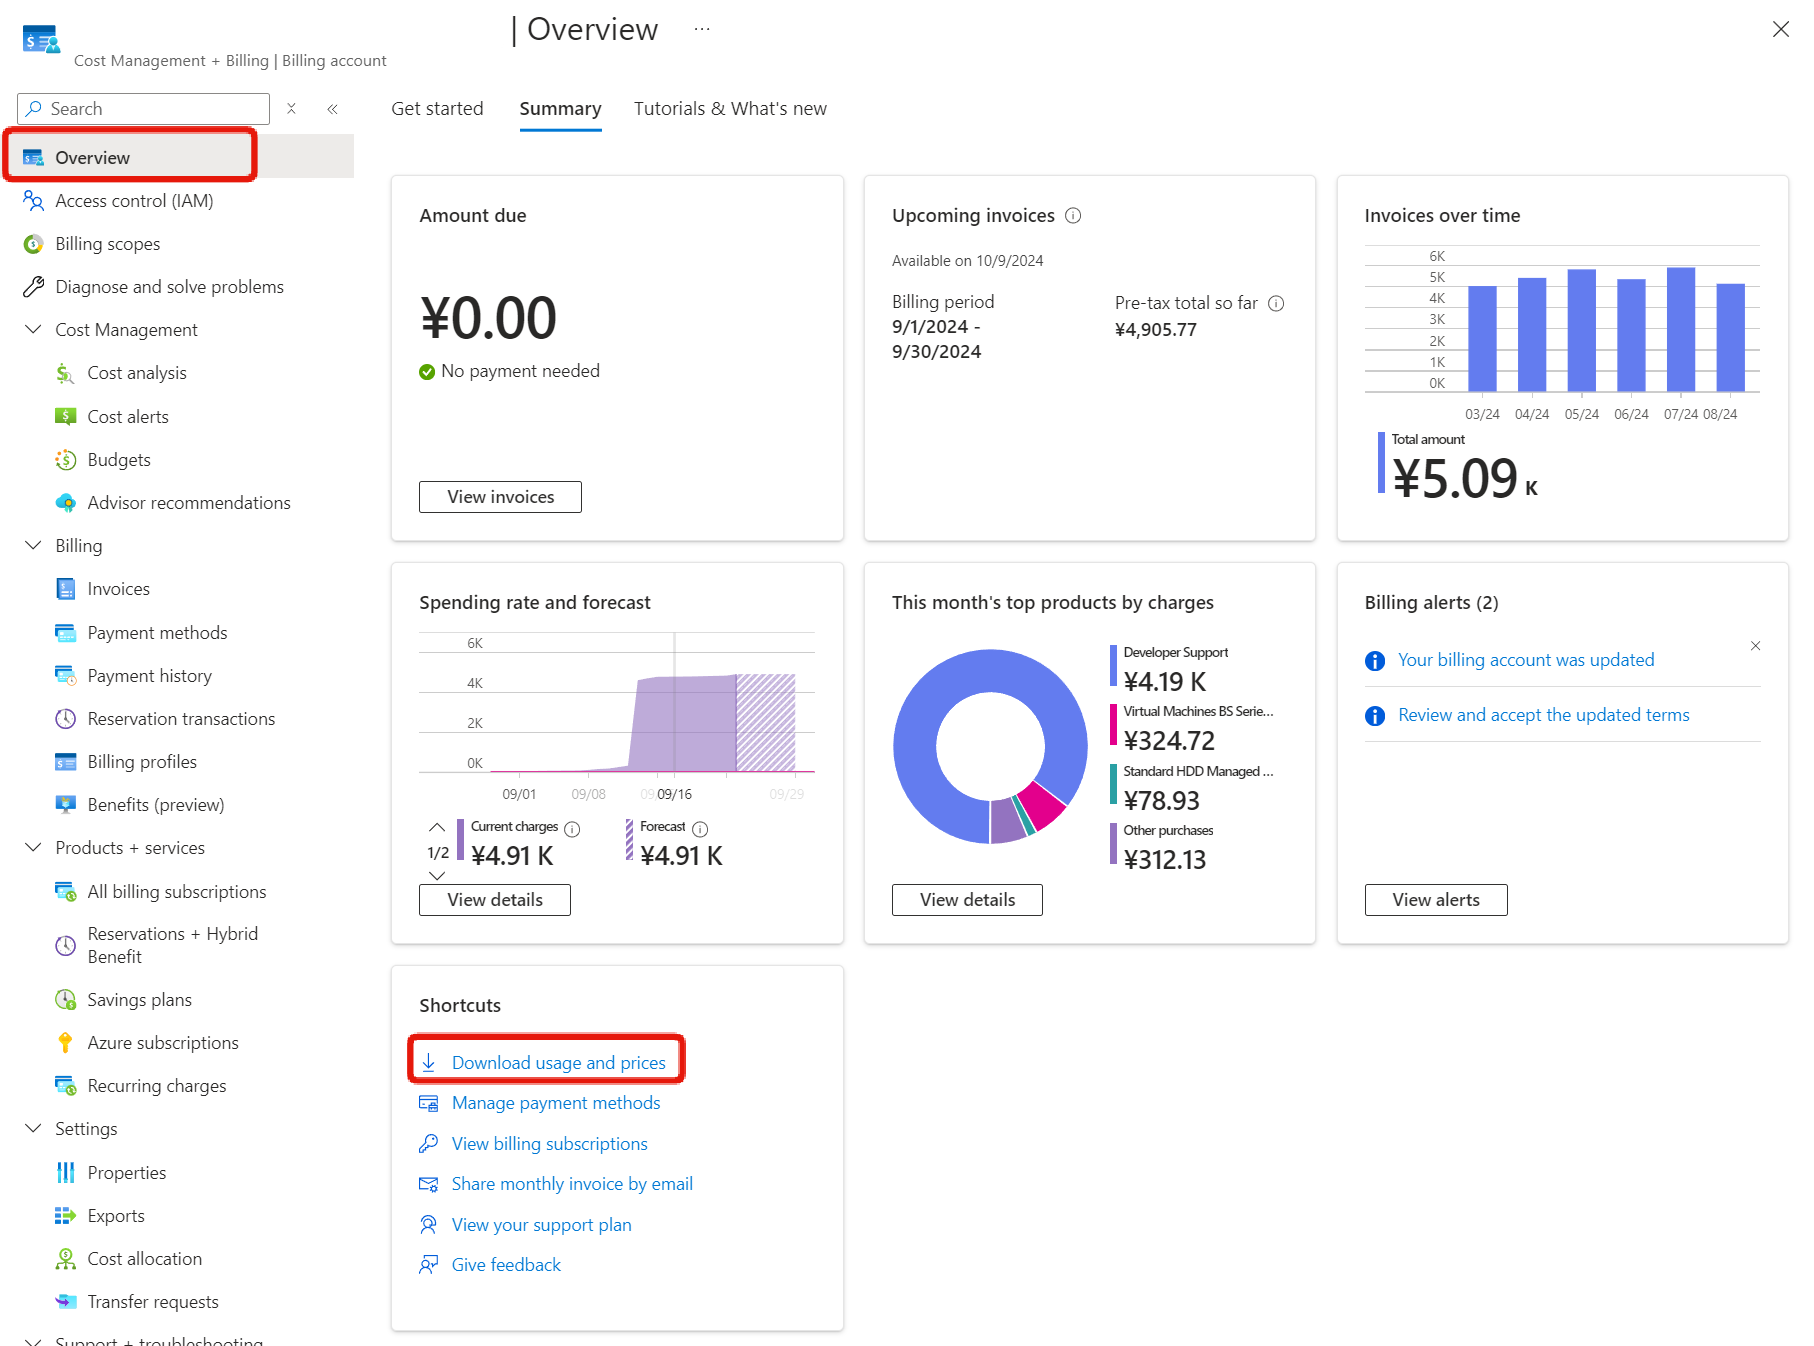 By clicking the “Download usage and prices” link, you can download a usage file with detailed records in CSV format (you can also download it from the Billing menu).
Refer to the Understand cost details fields in the official documentation for the CSV headers.
In addition to separating subscriptions, which are contract units, there are two ways to categorize billing details:
- Resource groups (resourceGroupName)
- Tags (tags)
The items in parentheses are the header names in the cost details and are included in the CSV file. We’ll discuss the use of tags later.
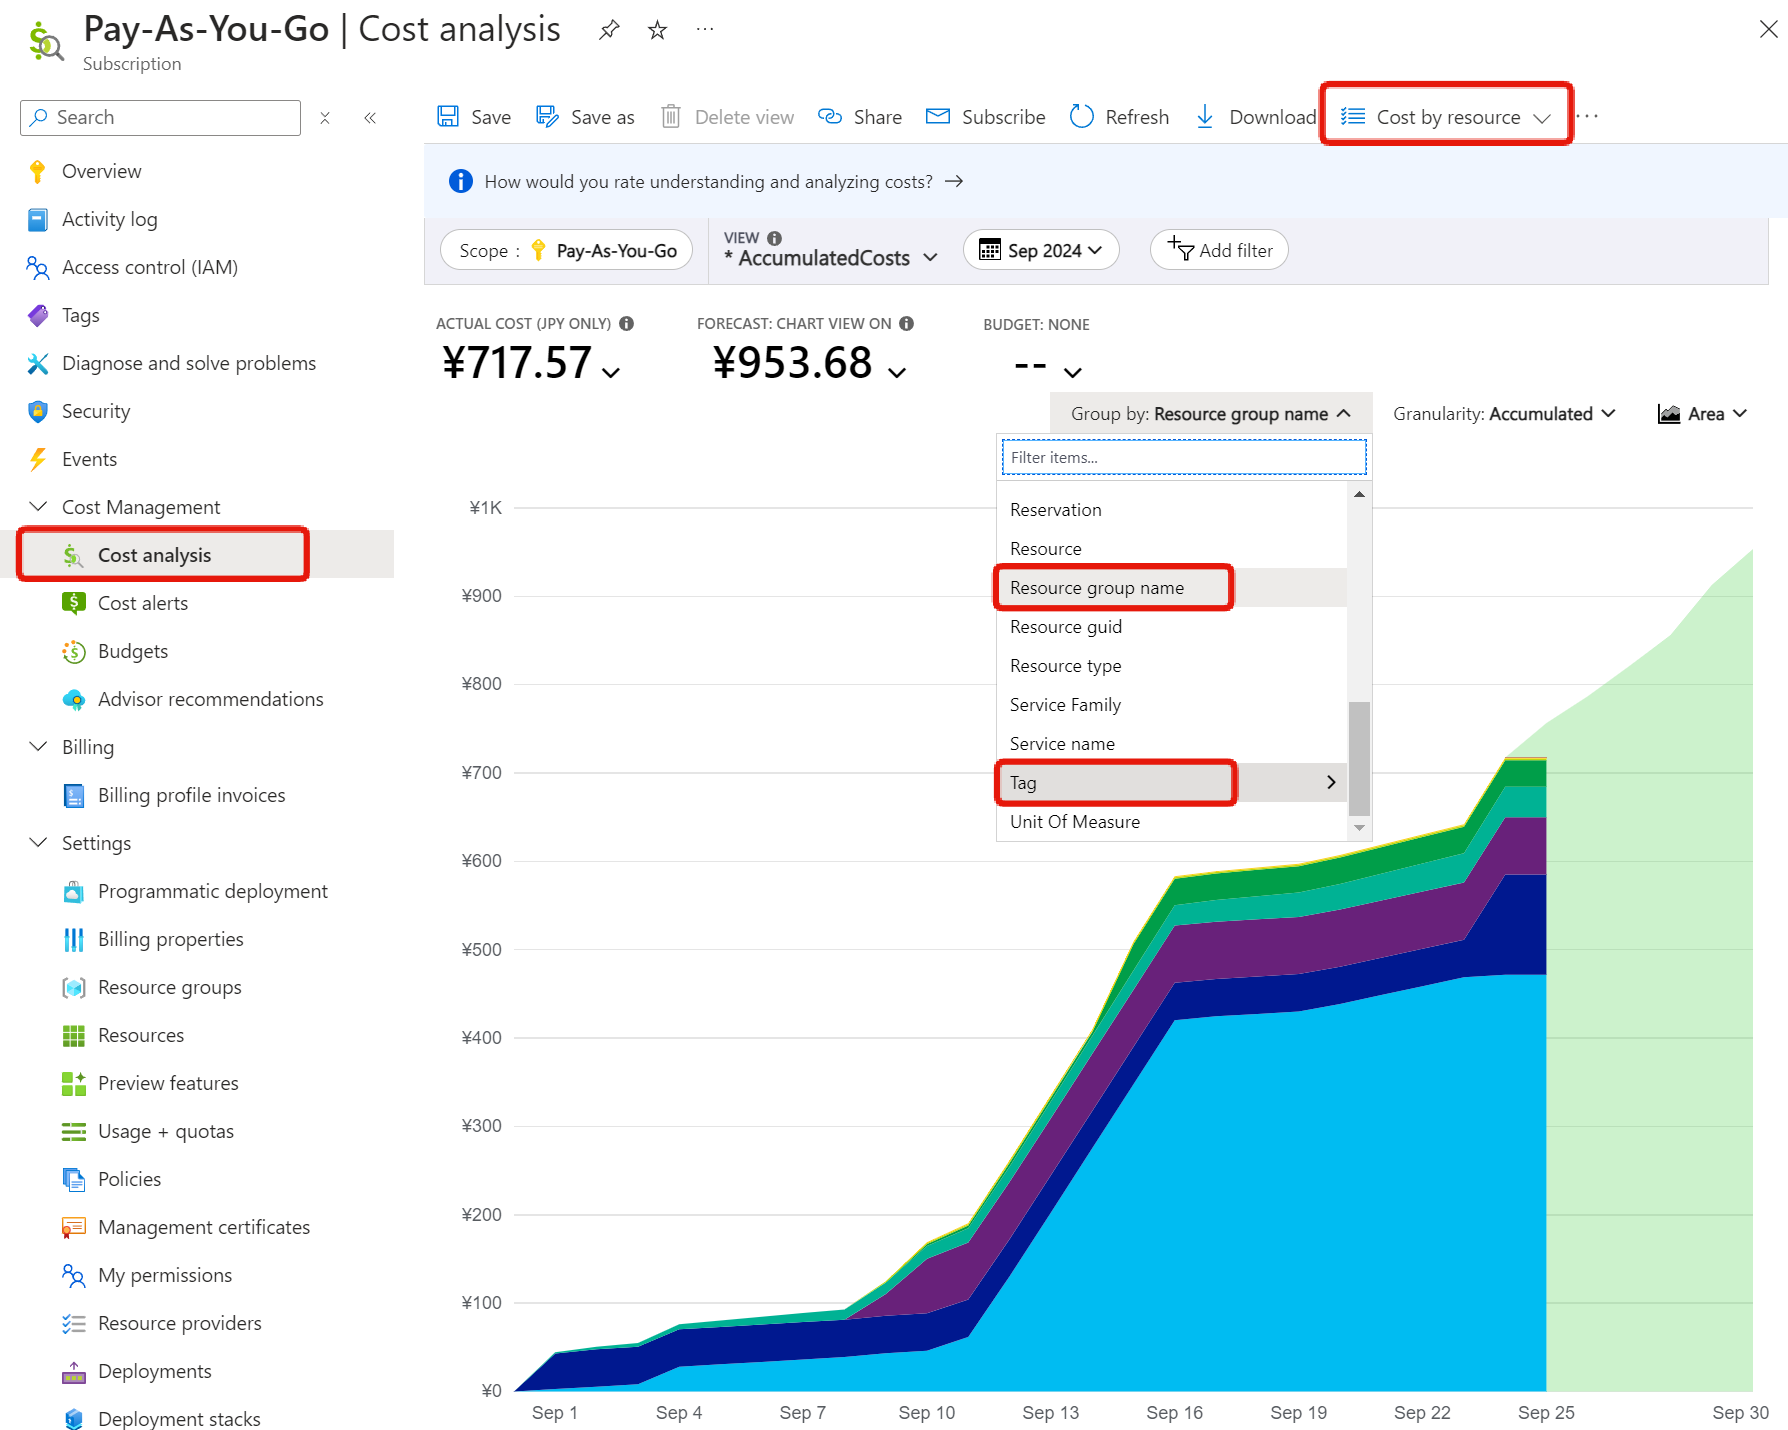
Another commonly used feature is “Cost Analysis“.
You can analyze costs by grouping and filtering different items. Again, you can filter by resource groups and tags.
“Cost by Resource is another common view. It’s used to identify which resources are costing money if you think this month’s bill is higher than usual.
Key Points:
Cost Management and Billing is used when you want to review and analyze historical Azure usage costs.
Tags
Tags are metadata (additional information) for resources, similar to markers or labels. They are registered as name-value pairs. You can specify them when you create Azure resources, or you can register them later from the Tags menu.
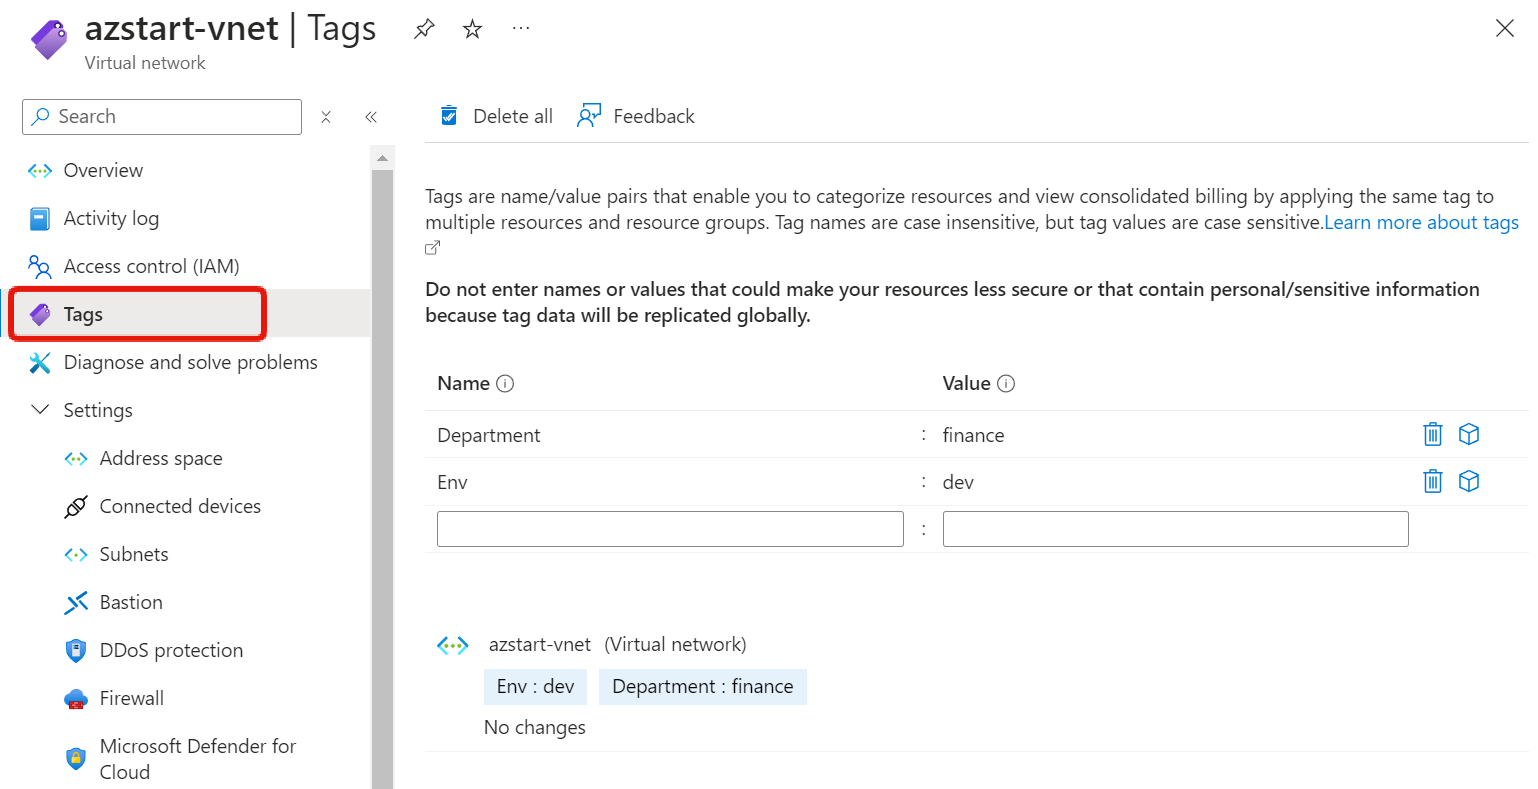
Multiple tags can be registered for a single resource. The default limit for the number of tags is 50. Be aware that tags applied to parent scopes such as subscriptions or resource groups are not inherited by child scopes (Azure resources) below them.
Common naming patterns for tags include information to identify the Environment or Department, which, as mentioned earlier, also serve as labels for categorizing billing details.
As shown in the examples in the Resource naming and tagging decision guide, you can also represent tiers such as Web tier or DB tier or indicate regions.
Tags can also be used as filter conditions when performing operations on resources, so it might be a good idea to use them as markers when you want to automate some process for specific servers.
Key Points:
Tags are useful for resource identification, cost categorization, and automation purposes.
Summary
In this article, we explained tools for estimating and managing Azure costs. Each tool is summarized in the table below:
| Tool | Purpose |
|---|---|
| Pricing Calculator | Estimate monthly cost by selecting services |
| Total Cost of Ownership (TCO) Calculator | Compared to on-premises costs |
| Cost Management and Billing | Review and analyze historical costs |
The AZ-900 exam doesn’t test detailed usage. Remember the purpose of each tool.
We also discussed the use of tags as a means of categorizing costs. Tags may be tested on the exam as a means of categorizing billing reports by department or office. Remember the use of tags along with the three tools.
See you next time!